We hope you love the products we recommend and just so you know that as an Amazon Associate EngineHoist.net may earn from qualifying purchases.
How to Mount an Engine to a Stand (Safe, Step-by-Step)
Mounting an engine to a stand is mostly about stability and correct hardware. The risky failures come from wrong bolts, weak engagement, and letting the engine hang off-center while you fight alignment.
Engine stands cluster: Best engine stand (US buyer guide)
What you’ll need
- Engine stand (correct capacity and head style)
- Engine hoist (to hold and position the engine)
- Correct bolts, washers, and any spacers needed
- Basic hand tools
Related: Choosing bolts for an engine stand
Step-by-step: mounting the engine
1) Assemble the stand and set it up on a stable surface
- Finish assembly fully and confirm casters are installed and tight.
- Lock casters if your stand has locks.
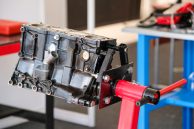
2) Position the engine and stand for alignment
- Use the engine hoist to hold the engine at a comfortable height.
- Roll the stand into position so the stand head can meet the engine squarely.
3) Set the stand head/arms to match your block pattern
- Adjust the arms evenly so the engine will sit centered.
- Avoid extreme arm extension if possible, it increases flex.
4) Install bolts by hand first (no cross-threading)
- Start all bolts by hand before tightening any single bolt.
- Confirm the bolts are the correct thread and pitch.
- Use washers so the bolt heads seat cleanly on the arms/plate.
5) Tighten evenly and verify thread engagement
- Tighten bolts in a criss-cross pattern.
- If a bolt stops early, back it out and check length and thread depth (don’t force it).
6) Transfer load to the stand slowly
- With bolts tight, gently lower the hoist until the stand is carrying the weight.
- Pause and check for flex, rocking, or any movement at the mount points.
7) Test stability before you rotate
- Confirm the rotation lock/pin engages properly.
- Rotate slowly and keep the engine close to neutral balance.
Common problems (and fixes)
- Engine feels loose on the stand: check bolt engagement, washers/spacers, and arm position.
- Hard to align: raise/lower with the hoist to remove side-load, then retry.
- Stand wants to tip when rotating: stop, re-center, consider a heavier/wider stand.
Disclosure: EngineHoist.net may earn from qualifying purchases. See affiliate disclosure.